CLICK HERE FOR FREE BLOGGER TEMPLATES, LINK BUTTONS AND MORE! »

Sunday, October 27, 2013

#98 Autumn Splendour

Creating Autumnal cards in October makes me giggle, because where I live, October is in our Spring.  Still, massive media saturation and traditions head our way, and we autumn all over the telly....and of course Halloween is creeping into our culture now in a bigger way.

The card I share today is a little late, but is for our AUTUMN SPLENDOUR CHALLENGE #98 at
Card Crafter's Circle ....we are sponsored by Robyn's Fetish Digital Stamps, and I have created with the Scarecrow and Pumpkins image... how sweet it is! I love the black birds....

Quite a simple card really... I stitched over the printed image (I printed it lighter than normal), and then triple mounted the image layer. I added a gold bow at the top of the card, threaded through the fold.

Aagh.... it's good to be back....even better when my own computer is working properly.... it fell foul to the last few weeks problems, but that's another story...

Thanks for peepin'!

Phew!

Wow... what a month.  And I thought things couldn't get worse.  They did.  More medical emergencies, dealing with psychotic episodes after medication reactions.... I look back at the last month and can hardly believe the things that happened ACTUALLY HAPPENED!  Thankfully, the medical emergencies were not as bad as they could have been, and after a few weeks in hospital, my father is home, and very HAPPY to be home.  Hubby and I are EXTREMELY HAPPY that our girl's massive reaction to the new medication is over.... that medication was stopped quickly, but it took nearly a week for it to completely exit her system, so we were still reel in the comedown from that one.

I have finally been able to track down a medical supplier who can provide me with compression gloves.  Basically, with the arthritis now causing carpal tunnel syndrome as well, I can't craft very much at all.  However if the gloves do as they are supposed to, I will be able to manage much more.  Here's hopin'!

Tuesday, October 8, 2013

Inspired by Candy at Incy Wincy!

Grab Our BadgeUgh. My post is late.... and I'm so sorry! I've been dealing with a medical emergency, and my head isn't thinking straight (if at all).  This post should have appeared 24 hours ago!

I've been honoured to be the guest designer over at Incy Wincy Designs Challenges for October. My first challenge (which started yesterday) with the awesomely creative team is themed "INSPIRED BY  CANDY".

I took inspiration from a  photo that I 'googled' .... yum!

 I think I'll have to be inspired to create some of these for Christmas! I'm particularly enamoured with the gumdrop jelly tree in front...

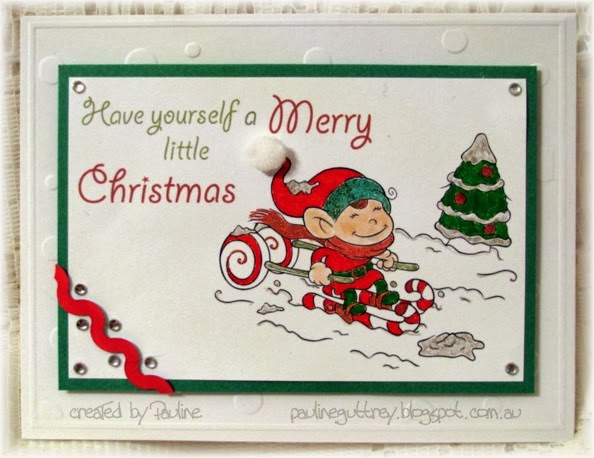
I created this card, using an image supplied by our sponsor....

I coloured with markers, gel and glitter pens., and the sentiment was coloured and snipped to fit around the image.

With such an empty white space in  the corner, I didn't know what to do... so I thought a wee scrap of ric rac with a few rhinestones might do the fill for me, without taking the attention away from that sweet elf and his candycane skis! I singly layered the image onto green card, and then mounted with foam tape onto an embossed white cardbase. I really didn't want to get away from the red, white and green scheme!


The INSPIRED BY CANDY CHALLENGE is sponsored by The Paper Shelter, who are offering an awesome $20 digi prize for the challenge winner, so I hope you'll come and join in the fun!

Thanks for peepin'!
 

Thursday, September 12, 2013

Arnold said "I'll be back"... and now I am!

Oh dear.  How neglected has my blog been? Poor thing.... I've been AWOL for quite a time... not by choice, but necessity and a recurring illness (the details of which I will omit).  I've missed my crafting and the blogworld dreadfully over that time.

But now that I'm back and beginning to work towards some positive shades of normal, I'm going to be blogging again, sharing my creations, and basically pestering my followers (if you're still here, that is!).

And friends, thank you for your support....you are dear to me!

Thanks for peepin'!
 

Sunday, June 23, 2013

Starhouse Set at Beccy's Place

Here are some creations for Beccy's Place!  This is a recently released set ... STAR HOUSE SET.

This is a fab co-ordinated digital image set, and consists of FIFTEEN PIECES!!! Five black/white images, five colour  images, and five words/sentiments. You can buy the images and sentiments individually, or as a set.

I have created two cards ... the first card uses the "Star Buttons" image, and three word of the set...

I  printed the images on the same layer, lining up the words with the buttons.  I coloured with red and blue markers, leaving the liberty line colour free.  I added metallic gold thread through the button holes, and added rhinestones in matching colours for the dotted i's. I matted the image later onto red and blue card, then wrapped it with a reef-knottted red grosgrain ribbon. I used a white cardbase, in keeping with a red, white and blue theme.

My second card uses the "Star Squares" image...

I printed the pre-coloured image, with a second stars square, and cut them out and sat them aside.  I created a matt for the white cardbase, using a vintage red/cream flora and red cardstock. I then created a smaller matt using a blue/white vintage floral and blue cardstock, and fixed these layers to the cardbase.  I turned the stars images and fixed them flat to the card, overhanging the matts. I then took the blue star image and overstitched the star and flag with gold metallic thread. I fixed it in the centre of the card using foam tape over the two star squares images.  I added dark red rhinestones to the corners to finish.

Want to see the new releases, monthly challenges, and a wonderful section of techniques and card fold tutorials? See you at Beccy's Place!

Thanks for peepin'!

Birdsong Set at Beccy's Place


Here are some creations for Beccy's Place!  This is a recently released set ... BIRDSONG SET.

This is a stunning co-ordinated digital image set, and consists of four black/white images, three colour  images, and two matching sentiments. You can buy the images and sentiments individually, or as a set.

I have created two cards ... the first card uses two images from the set, "Speckled Eggs" and "Birdsong".


I used the coloured image of Speckled Eggs, and did some layering with the Birdsong image.  The bird layered on the centre egg is enlarged somewhat.  I created matts and border with textured paper and textured cardstock, and added various sizes of black rhinestones.

My second card uses "Bird on a Wire" and the "Songbird" sentiment...


I printed the image, and then printed a second bird, that I could fussy cut, colour with markers, and layer with foam tape over the full image.  I didn't fussy cut his legs!  I chalked  the background, and stitched over the spiderweb with clear polyester thread. As the image is framed with a rustic distressed frame, I trimmed the image leaving a white edge, and coloured it  with an orange marker. I created a cardbase from one of my favourite core'dinations cardstocks, Black Magic, and distressed the life out of it with sandpaper.  I didn't think this gorgeous image needed any more dressing!

Want to see the new releases, monthly challenges, and a wonderful section of techniques and card fold tutorials? See you at Beccy's Place!

Thanks for peepin'!

Beccy's Blossom Bicycle

I  created this card way back in April, along with my Bicycle Built for Two ... a previous post.  Stupid me left this post on draft... I think the 'draught' might be between my ears!

This is my second creation for Beccy's Place using the new set... BICYCLE SET.  It is Beccy's first co-ordinated digital image set, and consists of three images (in colour and black and white line) with matching sentiments. You can buy the images and sentiments individually, or as a set.

I chose to create with the Blossom Bicycle, and a sentiment from the same set... although the pre-coloured bicycle looked more like my teen bike (it was purple) I decided to colour this one sparkling blue, like my first own "I paid for this myself" bike!


I coloured the basket and leaves with SU! markers, and the bike with blue glitter pen. I used white Aqualip pen for the seat (I should have used black, since my seat was black). I coloured the flowers using red, yellow and orange glaze pens, so they have a little dimension, and a sheen.

After choosing a bright and bold floral backing paper, I matted the image with textured vintage blue cardstock.  I then found that my original idea of using a white cardbase wasn't going to work... without matting the floral paper, it got lost... and any coloured matt seemed to harsh.  So I tried a red cardbase .... and bazingo! The flowers came to life, and the bike popped!  But a single rhinestone in the corners of the image layer looked lonely... so I filled the white space with rhinestone 'corners' instead.

Sadly after photographing my card, I've had to put my card to rest in the 'garden shed'.... my own little "Blossom" Becky happily hugged and touched the card after eating her chocolate Easter Rabbit... needless to say, chocolate and rhinestones don't mix well! But how fitting now is the sentiment...

Want to see the new releases, monthly challenges, and a wonderful section of techniques and card fold tutorials? See you at Beccy's Place!

Thanks for peepin'!

Feather Set at Beccy's Place


Here are some creations for Beccy's Place!  This is a recently released set ... FEATHER SET.

This is a delightfully co-ordinated digital image set, and consists of five  images (in colour and black and white line) with matching sentiments. You can buy the images and sentiments individually, or as a set.

I have created two cards ... the first is created with "Feather Trio".

I coloured the image with chalks, as well as chalking the background of the image layer.  I hand stitched top and bottom borders, and single mounted the image onto a white cardbase with a brown/copper layer.  I glittered the feathers with Clear Star glitter pen, to give very subtle shimmers.


My second card uses the "Peacock Feather" image, and one of the sentiments of the set.  The feather head is coloured with glitter pens, and the background is chalked. The image is triple-matted onto white cardbase, the layers being vintage green core'dinations cardstock, and a fabulous peacock-ish paisley pattern.  I added bright blue rhinestones to the corners.

Want to see the new releases, monthly challenges, and a wonderful section of techniques and card fold tutorials? See you at Beccy's Place!

Thanks for peepin'!


I'm baaaaack!

Okay, so perhaps you noticed that my blog has left two months between posts.  Not good.  Neither was I. First I was overcome for weeks with migraines, and we all know that migraines and computer screens don't mix. They kind of sorted themselves out, and then I had major hand problems - I have arthritic hands/fingers, but for the most part, my bad days are minimal.... but not so anymore!  I had major swelling like I;d never seen before... I couldn't even curl my fingers. And I'd never known such pain to come out of nowhere!  Now that's subsided, and I have lost the feeling in my fingers on my left hand.... really great since that's my dominant one! Test results aren't in yet, so I'm none the wiser.

Over the next few posts, I'll be having a Slow Pace Showcase.... my way of updating my blog with the cards that I have made during my 'down' time for Twist of Faith and for Card Crafter's Circle challenge blogs, but hadn't made it to my blog here.

Thanks for peepin'!

Friday, April 12, 2013

Darling Daisies

This week our challenge at the Card Crafter's Circle is themed DIE-CUTS and DRY EMBOSSING...so get out your stylus and all those fab die-cut machines! We are sponsored by the fabuous Floppy Latte Digital Designs, and we got to play with some fun images! I'm a self-confessed sucker for flowers, so I got to play with the Darling Daisies image...

I printed the image on white card, and matted with a thin surround of terracotta brown... I coloured the image border frame in a similar brown, so it looks like the image is triple mounted, when it isn't at all! I coloured the image with Promarker Aquas and a waterpen... the colour isn't even so it looks cool (well, at least I like it!).  I didn't colour the image background whitespace, because I wanted the bright flowers to really pop.

To finish the card, I simply fixed the image to a white cardbase, added a gold organza ribbon with a flat faux bow (which will also hold the card liner paper inside) and popped some deep yellow rhinestones in the image corners.

Where's the embossing? I used a stylus to emboss the yellow daisies... the centres are then popped securely with foam tape behind them.  It doesn't show particularly well here, which is probably testimony to my lack of photography skills!

I am also entering this card into the following challenges: 
Happy Campers - #14 Flower Power (16/4)
Crafting By Design - Spring Flowers (17/4)
Crafting for all Seasons - #49 Floral Delight (17/4)
Come on over and join our DIE-CUTS AND DRY EMBOSSING challenge at Card Crafter's Circle!  Thanks for peepin'!

Tuesday, April 9, 2013

I'm Gettin' in Shape!

At Twist of Faith this week, our challenge theme for you is to create a SHAPED CARD! That is, not our regular shapes of square or rectangle.  As we always do, your creations are to include a scripture, verse or quote that is positive and encouraging.

This week, we are sponsored by  Digi Darla's Designs, offering our random prize winner a generous stash of images! I have combined an image from our sponsor...and a digi text I created using Matthew 7:7...

I printed the image and trimmed it out, after colouring with SU! markers, and highlighting the brass fittings with glitter pen, and the light with Clear Rock Candy Distress Stickles. I trimmed the scripture (printed on vellum) to fit the cut out window pane, and fixed it to the back, before fitting the image to a textured brown folded card ...  I then used my paper cutter to trim the top peaked edges, and used scissors to cut the sides by hand.  The card is hinged (folded) at the bottom step, and at the top (the cut out doesn't show properly). To the door handle fittings, I added champagne coloured rhinestones.

I have very little depth perception, so hopefully I've coloured in the right areas that should be darker due to shadows and depth....it's a flat card, but hopefully it doesn't look that way! :-)


This card is also entered into these challenges:
WordArt Wednesdays - Anything goes (10/4)
Milk Coffee - Anything but Square (11/4)

The design team showcased some  fabulous images from our sponsor this week, so I hope we can inspire you to join us in our SHAPED CARD Challenge at TWIST OF FAITH CARDS! Thanks for peepin'!

Friday, April 5, 2013

Bugs!

This week our challenge at the Card Crafter's Circle is themed BUGS ... get your gorgeous laces and vintage embellishments out!  We are sponsored by the fabuous Eureka Stamps, and we got to play with some fun images! I adore ladybugs, so I created my card using the Ladybug Border image...

I printed the image on white card, and coloured only with red markers.  I trimmed my 'border' to fit my card, and found that I had a large ladybug left over, so I trimmed her out, and set her aside.  I matted the image with bright green and a watermelon red paper, and fixed it straight to the cardbase.  Using a Create with TLC scripture printed on vellum, and my leftover ladybug, I filled the whitespace without too much fuss.... I fixed the vellum with doublesided tape only under the ladybug, and I drew her antennae in with a signo pen.

I am entering this card into the following challenges: 

Addicted to Stamps and More #39 CAS (10/4)
Crafting By Design - Animals (10/4)
WordArt Wednesday - #74 Anything Goes (10/4)

Come on over and join our BUGS challenge at Card Crafter's Circle!  Thanks for peepin'!

New Life at Twist of Faith!

Well now, I really messed up in a NEW way this week.  I haven't been at my blog for two days, and didn't notice until today that my Twist of Faith card did not appear on Tuesday. I knew full well that I had readied the post to coincide with the scheduling of the challenge!  On my discovery today, I realised my mistake.  I had set it to post on Friday instead of Tuesday!  I guess it shows that I'm having a really rough week! On with my show....

This week (and there is still oodles of time to join in!) our challenge for you at Twist of Faith Cards  is NEW LIFE ... whether it be babies, spring, or something new for you... so many interpretations! And of course your creation is to include a scripture, quote or verse (that is positive... words of cheer,  healing, encouragement, or support).

We are sponsored by the wonderful Michelle Perkett Studio, and I can't do anything BUT love Michelle's images and artistry! I created my card using the Princess Lotus image...

I drove myself nuts trying to place my scripture on the front of my card... so I eventually gave up, and placed it inside.

“For I know the plans I have for you,” declares the Lord, “plans to prosper you and not to harm you, plans to give you hope and a future.”  Jeremiah 29:11

I coloured the image with Spectrum Noir alcohol markers, but used a Pro Marker Aqua for her hair... I think the aqua markers give a better 'uneven' colour for hair!  At least in my meagre collection of markers it does!)  I used glitter pens to touch on her sari trim, and rhinestones in the centres of the flowers she wears. I matted the image on white and then vintage textured blue, then on a wonderful floral paper, and on the blue again.  All is fixed onto a white cardbase.

The design team has created some marvellous designs in the showcase at the Twist of Faith Cards blog, so I we can entice you to join in our NEW LIFE Challenge!  Thanks for peepin'! 

Monday, April 1, 2013

Bicycle Built for Two


This is my first creation for Beccy's Place!  The new set we are creating with is BICYCLE SET.

It is Beccy's first co-ordinated digital image set, and consists of three images (in colour and black and white line) with matching sentiments. You can buy the images and sentiments individually, or as a set.

I chose to create with the tandem bicycle, and the matching sentiment... I initially had in mind a fun twist on a wedding card, but chose colours that were a little more casual, like picnic blankets!

I coloured the image with SU! markers, and used white Aqualip pen for the seats and handles to give a little dimension.  I added a little touch of silver metallic glitter pen to the pedals and cogs.
After choosing the backing pattern, I then picked a more condensed darker pattern to matt the image.  I then stitched a border on the image layer, in DMC floss in varigated blue/green thread, which seemed to match the pattern papers. The matted image has been mounted using foam tape for dimension.

I am also sharing this card in these challenges:
Chocolate Coffee and Cards #35 Spring (4/4)
Daring Cardmakers "Springing Into Spring" (5/4)
Our Creative Corner "Travel and 2 DPS" (5/4)
Digi Haven "Spring" (11/4)

Want to see the new releases, monthly challenges, and a wonderful section of techniques and card fold tutorials? See you at Beccy's Place!

Thanks for peepin'!

Friday, March 29, 2013

Baby Bib

This week at the Card Crafter's Circle, our challenge theme is BABIES.  Our sponsor is Robyn's Fetish - awarding our prize winner their choice of 5 images!

I created a Baby Bib card,  using our sponsor's image "Playtime"...

Using a paper template, I cut my bib-shaped card from cream cardstock... using the card fold at the shoulders, so it stands as a 'tent fold' card.

My image was coloured using Spectrum Noir markers, and fussy cut.  I also added black rhinestones as the bear's eyes and nose.

I trimmed the card with lace, fixing it on the inside of the card, doodled a border, and fixed the bear image in place.

Our Design Team created a really sweet showcase of baby creations to share with you this week, so I hope you visit us at the Card Crafter's Circle, and join in our challenge!   Thanks for peepin'! 

Tuesday, March 26, 2013

Happy News!

Hi!  I'm thrilled to finally be able to announce I'm part of the Design Team at Beccy's Place! If you haven't seen Beccy's designs, they are so awesome!

I was allowed to shout it out yesterday with the official announcement at Beccy's Blog, but I was out of town with appointments all day, and was so exhausted on arriving home, I didn't get online. Oh and Beccy's Blog has freebies, and is full of fantastic tutorials and creations... Beccy is an awesomely inspired and talented lady!

Visit My Digital StoreThe new design team is spread all over the world and .... wow... I sure am in talented company!

Annie
Emily
Carla
Malin
Marianne
Pauline (you're with me now!)

I hope you'll come meet us all, and see our first creations with Beccy's new designs very, very soon! Thanks for poppin' by'!

Sunday, March 24, 2013

Layers of Sunshine

I've created another card for the Lacy Sunshine #4 Layers Challenge, this time using the fortnight's free request image,  Anastasia and Poppies.

I am really grumpy with Blogger... it seems that each time I try to upload an image, it rotates the image to the right... so I go back and rotate the image to the left, hoping that when Blogger does it's  'thing' it will appear the right way up... but oh no... it has to put me through the ringer 5-6 times before I can get the image up the right way! And to boot, the picture here isn't as as sharp as the original picture.... argh!

I printed the image with a sweet text from TLC Creations ... I thought the image married perfectly with melancholy Anastasia.  I coloured the image with Spectrum Noir markers, and I used Le Plume Pigment markers for the green and 'black' (which was really a dark grey). keeping to greens and neutrals. I added Clear Star Glitter Pen to the flower centres and feather.  I left the background neat, so that it popped with the black and white matt layers.  The image layer was simply matted with three layers of paper/card, and fixed to a white cardbase.  I added deep red  rhinestones to the four corners of the image layer.

This card is shared in these challenges:
Lacy Sunshine #4 - Layer It Up! (24/3)
Stampin' For the Weekend - Child's Play (28/3)
My Time To Craft #214 Gothic (3/4) I hope the colour palette fits!

Thanks for peepin'!

Friday, March 22, 2013

Sunbonnet Seamstress

At CARD CRAFTER'S CIRCLE this week, we have a SKETCH CHALLENGE for you.. and we're pretty casual about it... you can flip, stretch, rotate, or add to the sketch (as long as we can see the original sketch in your design. You can see that I took some liberties with my creation below!

We are sponsored by  Digi Darla's Designs, offering our random prize winner a generous stash of 5 images!

My card features Sunbonnet Seamstress #3...

I printed the image twice, nipping the wee birdie out of the second image.  I trimmed the full image layer to fit my card base (allowing for matting as per the sketch).  I coloured the image with Spectrum Noir markers, and created the layers of my 'spotlighted' birdie, adding pen dots to edge the circle and image layer.

I fixed all the layers together, wrapped a scrap of mauve ribbon (waaaah! my last piece of this one!) and secured it, then fixed all to the cardbase.


The design team showcased some  fabulous images from our sponsor this week, so I hope we can inspire you to join us in our SKETCH CHALLENGE at CARD CRAFTER'S CIRCLE!

Thanks for peepin'!

Tuesday, March 19, 2013

Easter Lillies

This week, our #29 challenge for your at Twist of Faith Cards, as an EASTER THEME! And of course, your creation is to include a scripture, quote or verse (that is positive, healing, encouraging or supportive).  Our sponsor is the wonderful Robyn's Fetish Digital Stamps.

For this creation, I used our sponsor's image LILY ... when I saw the image, I had to create with this one!  Okay, I admit, I love lillies. 

I created my digi text... If you would like this text to use, I would be happy to email it to you... just leave a comment on my post or email me! I will soon organise a linked storage site for my goodies, but until then, you'll have to email me! 
I sized the image with my scripture, and also copied and flipped the image, to sit on both sides of my scripture.  After printing and trimming to size, I coloured the image with green marker and added blue and pink pearly chalks to the lily centres.  Plain. Simple. Bold.  I matted the image layer with purple card, then added strips of velvet ric rac ribbon.... how yummy is that ribbon! I then added a lighter shade paper matt, and another matt of the same purple cardstock.  All fixed together to a white cardbase.  

I was going to bling it a little, but couldn't decide where to add anything.  So I chose not to, leaving the images and scripture to BE the card.

I'm also sharing this card at:
 Word Art Wednesday #71 Anything Goes (20/3)
Catered Crop Flowers (31/3)
Lia Stamps Challenge - Easter (31/3)
Digi Haven - Easter (29/3)
2 Sisters - #135 Flowers for Spring (22/3)
Creatalicious Challenges #46 Easter (15/4)

The design team has created some marvellous designs in the showcase at the Twist of Faith Cards blog, so I we can entice you to join in our EASTER Challenge!  Thanks for peepin'!