CLICK HERE FOR FREE BLOGGER TEMPLATES, LINK BUTTONS AND MORE! »

Monday, August 30, 2010

What transport do YOU prefer?

I decided to enter the challenge at Creative Craft Challenges .... the theme being "Car Train or Plane, what method of TRANSPORT do you prefer?".  Mmmm had to think about this one, what images do I have?  Well, being I like to do things a little on the odd side (sometimes!) I chose a more REGIONAL method of transport.....

I admit it, I've always wanted to ride an elephant.  And I haven't.  Yet. But what a fun way to get around.... although I wouldn't like to be a street cleaner.....

Ingredients:  Digimage "Tink" - SNB; Cardstock - Basix; Paper - Basic Grey; Markers - Bic; Stardust Pens -Sakura; Teal pearls, Aqua Rhinestones - Kaisercraft; Gold Sentiment Stickers.

I love this image from SNB.... just divine.  I coloured Tink with Markers, and added stardust glitter pen to many of her adornements.  I had to use the BG paper with Tink, because it was so busy.  They reminded me of each other! Tink was simply trimmed and added to the layers.  With all the busy patterns, I didn't think too much embelishment was necessary.   But, I added aqua rhinestones to her eyelashes!

Thanks for peeping!

Renovations...

I felt that I had so many links on my sidebars.... of pages I love to visit, cardmakers, scrappers, sketches, inspiration and all that jazz.... I felt like I was in perpetual scroll mode.... alsways scrolling scrolling scrolling ti find the link list I wanted.... so, since I had already created pages of links for my Digi Stamp Artists, Vintage Pages, and Challenges (and there were so many of those!) I did the same for my CardMaking buddies, Scrapping pages and blogs I love to visit.

I'll be creating pages for each link category, so they will be easy to find.  And since Blogger allows only 10 extra pages, I hope I don't need any more categories! LOL

Sunday, August 29, 2010

My Inkie Fingers Blog Candy!

Visit My Inkie Fingers!
I just stumbled across a groovy re-newed blog, I love the logo .... don't you?   Anyway, to celebrate a revisit to blogland, there is a candy up for grabs, and the winner will be drawn September 7.....it's easy to enter, so clickie on the link to the right to visit and enter the candy draw!

Friday, August 27, 2010

Just Fishin' Around...

This card is going to my nephew who monkeys around! This week's image from Designed 2 Delight is named Fishin' Around.  Just too cute!

Ingredients: Cardstock - DCWV (cardbox, and stack); Markers - Bic; Glaze Pens - Sakura; Rhinestones - Kaisercraft.

This one is reasonably flat, so it can be posted safely..... I've simply coloured the image, and added glaze pen to outline the water around the monkey, the 'floatie' and his nose.  I loved the bold stripes of the cardstock, so I kepy the image in blocks of colour to contrast against finer stripes..... thanks for peepin!

In a Fishbowl

I thought this was the cutest image - it reminded me of a previous workplace - our conference room was affectionately known campus wide as 'the fishbowl' because it had three walls of glass! This image from SNB is named Fishbowl.....available at the SNB shop now...

Ingredients: Acetate - Kaszazz; Embossed Cardstock, Teal Pearls - Kasiercraft; Markers - Bic; Stardust Glitter Pens, Glaze Pens - Sakura.

I had fun making this one.  I coloured the image with markers, and added glaze pen at the top and bottom of the bowl, and fishie's eyes, then glitter pen on the fish, seaweed, and sand. I thought I'd need a LOT of glaze pen to make it look glassy, then hit on the idea of using the image behind acetate, to give it that glassy flishbowl look.... so that's what I did .... I've adhered the image on the inside of a folded 'card' of acetate. 

The embossed cardstock was cut to fit inside the acetate card, and has a leaf pattern on it - kind of fishy shapes, huh?  I also added teal pearls for the fishie's bubbles, and they are on the outside of the acetate.

Thanks for peeping!

Feeling Chipped?

This image is called Chip, and is a new release from SNB this month, and is available instore now..... I thought it would be very appropriate for a get well card, or a pick-me-up .... I often feel like a chipped cup! LOL

Ingredients: Cardstock - DCWV; Markers - Bic; Mini brads - Craft Affair; Teabag tag - Liptons; Rub-on sentiment - CraftLovers.

To create Chip with dimension, I printed and coloured (selected bits) twice. I cut some a centre section from one image, and adhered them with foam tape.  The Teabag tag is adhered to the back image through the top image, and hopefully looks like it's dangling from inside a cup!

I actually made this card for a friend who needed a bit of cheer, likes funny cards (or bad humour!) and loves a good cuppa.  I hope she likes it!

Thursday, August 26, 2010

Blog Hop is imminent!

Hello everyone.... just giving you some advance notice, that on August 29 (USA time) there will be a super blog hop happening....
The whole SNB Design Team is taking part, sharing creations which showcase a new fantastic set from SNB!  Each Blog will have a digi prize for a visitor who comments on their creation, and there will be another draw, from all the commenting visitors to win the whole tootin' set!  Woohoo!

I'm going to be away on a Scrapbooking Retreat when the hop starts (oh poor me!) so I've scheduled my post to appear at the right time (when it starts in the US)..... so set your clocks for US Mountain Time Sunday!

Wednesday, August 25, 2010

Creme Brulee

The challenge at For Fun Challenges this week is being sponsored by Craft  Brulee (an awesome shop out of the UK!)  They have some amazing goodies to savour, which we were lucky enough to play with, and they are offering a prize pack for our challenge winner.... which is too exellent to describe, so I'm just going to post a pic!


The challenge theme is an anything goes, but you must use ribbon or lace .... the team had some Creme Brulee goodies to play with, and came up with some totally AWESOME creations! Head over the the challenge blog to see, grab some inspiration, and join in the challenge!

Ingredients: French Couture 2 image - TLC; Cardbase - Craft Affair; Deco Papers - K & Co; Matte Chalks, Pearl chalks - Pebbles Inc;  Lace, Rosette - Creme Brulee; Teal Rhinestones, Teal Pearls - Kaisercraft; Pink Le Plume pen - Marvy; Metallic Blue Gel Pen.

I coloured the image with chalks, and trimmed the image (I added pen detail to the bodice lace).  After determining the layout from placement of the rosette and lace, I edged the papers with the pink Le Plume, and added the lace (I had already knotted) and the Rosette.  I adhered these layers to the cardbase, and then the image was fixed in place.  I added pearls to the corners, and dressed the image - pearls for the earrings and bracelet, rhinestones for the ring and buttons. 

This is a fantastic image from Paulette at TLC - I couldn't decide if she was wearing lingerie, or just some sexy haute couture, so I dressed her as if she was standing in her 'boudoir' .... knots in the lace and the ruffled rosette reminded me of all the lace and finery one might see in a maison de derriere! LOL  Thanks for peeping!

Tuesday, August 24, 2010

KyLin in Pink

Hi! Just wanted to share a new digi that I picked up from SNB - This is KyLin.  I just love the Zen collection!

Ingredients: KyLin digi - SNB; Patterned Cardstock - K & Co; Markers - Bic, Stardust Pens - Sakura; Chalk - Pebbles Inc; Rhinkestones, Rub-ons - Kaisercraft, Flower embellishment - Creme Brulee.

I coloured the image and trimmed it out.  I created the card and layers from a K & Co Pad.  I placed the ribbon/flower embellishment first to help determine the layout. The flower reminded me of a peony.... I love them.... and the sequin loop on it gave me a petal/island for Kylin to stand on.... After I fixed the flower and the image, I added the rub-ons ....  it was a 12" border, but I used it in sections to create a little leaf-ery for the flower, and added in som butterflies.  Rhinestones went on last.

I'm entering this in the 365 Cards Challenge, Day 177 Colouring 4 Ways ...... I used the computer for the skin tone, Bic markers for most of the image, Stardust pens for the rest, and added pearl chalks for her cheeks.... thanks for peeping!

Irit has such sweet candy!

Click here to visit!
Hi....just wanted to let you know that Irit at Irit Shalom is having a fantastic blog candy, which will be drawn at reaching 175 followers/10 September.   There are way to many things to list, so here's a picture for you....

If you are a new follower, join on and join in the candy! I f you've been a long standing follower, you have two entries automatically.  If you blog about it as well, you get an extra entry - so you'll have 2 OR 3 entries!  Great chances to win!  And she will ship the prize worldwide!  Go see! Yay.... I have 3 entries in the draw!

Saturday, August 21, 2010

Sweet Sweet Candy...

I just stumbled across a REALLY sweet blog candy giveaway..... Lori has a fantastic selection of stamps for someone lucky! See,  here's what you win! Stamp sets from:
Kitchen Sink Stamps-Letters from the Past, Tim Holtz Collection-Mini Cirque Alpha, Donna Salazar-Collection of 6 Singles, Clear Stamps-Fall, Unity Stamp Company-Along for the Ride, Schlosser Designs-Outside the Box, A Muse-Mainly Men Set, American Crafts-Bouquet, Lizzie Anne-'Sixlets'-Banner Birthday, Pink Paislee-Bayberry cottage, Maya Road-Mini Banner, Jillibean Soup-Calendar, Stamping Bella-Daisy Balloon, Basic Grey-Basic Notes, Chipboard Jigsaw Alphabets - Making Memories, Small sunburst punch, Stampin' Up Designer Hardware. WOW!

So pop over to visit Lori and her creations, and join in the draw!  Take your favourite colours with you!

My Little Betsy Ross

I've just created my own little Betsy Ross - I guess she should be holding Old Glory instead of a Teddy (unless his name is Roosevelt).  For those that don't know Betsy, she is a pretty special lady in US history... and in sewing circles too I guess!  She may not be so familiar to those outside the USA (I'm just a sucker for history! LOL)....

Ingredients: Cardstock - unknown; Markers - Bic; Heart Border Rub-ons -  Kaisercraft; Cork/Chipboard Sentiment - Bella.

I used the Goldilocks image from the Michelle Perkett Studio, and she is available for FREE this week at Operation Write Home, as well as another sweet image, called Mary Margaret.  I coloured and trimmed the image, and kept her RED WHITE and BLUE.  I added only a rub-on border, and an adhesive sentiment. Our Aussie postal regulations for lumpy overseas mail is a right royal pain, so I'm glad I tried to keep the card flat - it's more likely to get through the sorting and through customs easier!

OWH is a way for paper crafters to show our support for troops deployed away from home. Papercrafters make cards that the troops can send home to their loved ones. Pop on over to OWH and grab your free images, create a card to enter in the challenge and send the card off (details are at the blogsite) then get the card to the troops. Michelle Perkett Studios is sponsoring the challenge there this week..... the challenge is to make a card using any Michelle Perkett image (you can use a freebie image, or one you have or may purchase from the MPS etsy shop.) After creating your card, you can enter it at Operation Write Home and in the Anything Goes Challenge at MPS!

I have also entered this card in the challenge at OWH.

Thursday, August 19, 2010

Oh to Wear Heels....

I'm hosting the challenge at One Powerful Hour this week.... my chosen theme is 
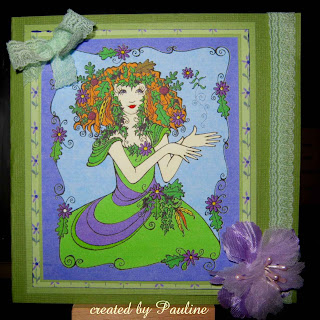
SHOES! I hope you'll pop over and join in with us... the only requirements for the challenge are to follow the theme, and your creation must be finished within an hour!  I was pleasantly surprised with my creation .... it took much less than an hour! More surprisingly, I didn't make a card....

Ingredients: Shoe Template; Cardstock - Basix; Double Sided Paper, Rhinestones - Kaisercraft;  Flower Buckle - unknown.

I think I should also pat myself on the back for only using 4 items for my creation, as I'm sure this is the least I've ever used..... ever! And although I already had the template to use for this, there are many freebies that can be found if you scour the net ...

I simply cut out the pieces (cheating a little, by printing one page of pieces directly on the patterned paper), and followed the instructions to complete the sandal.  I chose a double sided paper, as the patterns and colours would co-ordinate.  No thinking on my part.   I had to do a bit of trimming, as the heel doesn't fit the shoe shape well.  Luckily it can't be seen here.  Also, I took a tangent from the instructions to create the sole of the shoe using two pieces of cardstock, rather than just using a sheet of  paper/CS as suggested.  So the straps and over-toe are actually sandwiched betwixt two layers, just as a real shoe would.

I added rhinestones across the over-toe, and a metal buckle for the strap.  I think it's quite safe to say that this is one shoe I'll  never wear! Although I ooh and aah over shoes and boots like and other girl would, my passion lies with heeled boots. And comfortable shoes.  Pointy Toes and Stillettos are a thing of my past.

Do join us at One Powerful Hour this week! Thanks for peeping!

hugs and blessings,
Pauline

Wednesday, August 18, 2010

1 2 3 For Fun

The challenge this week at For Fun Challenges  is to create using a 1-2-3 recipe:  1 ribbon, 2 papers, and 3 embellishments.  Here is my offfering:

I took some creative liberty in that: I have counted the floral fabric (the paper I had just did not look right).  The finished card measures 15cms square.

Ingredients: Cardstock - Bazzill; Paper -  Cre8tiv; Fabric - La Moda; Vintage Pic/photo; Lace, Ribbon - unknown; Rhinestones - Kaisercraft; Apricot Rose - unknown.

In keeping with the recipe, I have used:
1 ribbon - thin satin, layered over the lace);
2 papers - olive green, and floral fabric;
3 embellishments - lace, rhinestones, apricot rose.

hugs and blessings,
Pauline

Tuesday, August 17, 2010

Pumpkins, my favourite!

Pumpkins are my favourite vegetable.  Alongside potato...   and corn....  and beans. I make a lot of pumpking soup in the winter, using only butternut pumpins.... just love their sweetness.  So I really enjoyed creating with this week's Designed 2 Delight challenge image!

Ingredients: Textured Olive Cardstock - Craft Affair; Papers - Kaisercraft; Markers - Bic; Chalks - Pebbles Inc; Sequin Flowers - 'vintage' unknown; Gold Peel Off Sentiment.

The image was coloured with markers, cut and trimmed.  I discovered that the cardstock I was using has faint indent... yikes... at regular intervals.... YIKES!  I won't be buying this brand of white stock again.  To tone the white cardstock, where I couldn't trim around the wheat, I coloured with chalk....

I let the patterns do the creating this week.  These papers are from the Tea At Elsies 6" pad from Kaisercraft.... lots of co-ordinated patterns, embossed, borders, the works.

The sequin flowers in the corners were purchased from a flea market - sometimes where I have my market stall, there is a lady selling her old craft items.... I find some great stuff to use!
 

MPS Challenge #41 Anything Goes!

Our first challenge at Michelle Perkett's Studio, is #41 ..... an Anything Goes theme.  As the  new DT was anounced with our last breath, we were allowed to share a card we have previously made, using an MPS image.  I chose to use the card I made for the Earth Day Blog Hop (and following with it's theme, we were to breathe new life into previously used items....

Ingredients Used: Image - Earth (MPS), recycled component cardstock, patterned paper (used recycled gift wrap), lace (it's precious life was on lingerie!), organza/silk flower (I coloured this flower with a marker.... it's previous life was in a 70s wedding bouquet!), Bic Mark-Its.

As the challenge is an Anything Goes, you can do anything you want.  But of course you must use an MPS image. Remember to use a Michelle Perkett image somewhere on your creation. If you don't have one of Michelle's images you can find a freebie here or here,  or visit Michelle's Etsy Store to purchase one of her stunning digital images.
 
The challenge winner is randomly selected, and will receive a $10.00 voucher to be used at Michelle's Etsy Store .... so what are you waiting for?
 
I hope you'll join us!
 
hugs and blessings,
Pauline

Monday, August 16, 2010

Michelle's Mermaids!

Click here to visit!
I am thrilled to announce that I was offered a posi on the Design Team at Michelle Perkett's Studio!  Michelle is the most incredible artist - if you aren't familiar with her designs, you really need to visit to see them!  The most incredible Mermaids, and Angels, and Fairies.... oh my!

I've just visited all the other 'mermaids' .... wow.... I am honoured to be amongst some AMAZING talent! All the DT links to the left are active, so grab a cuppa and visit them too!

I am so excited I could just burst!

hugs and blessings,
Pauline

Saturday, August 14, 2010

Happy Birthday!

Michelle over at Michelle Perkett Studio, is having a celebration! Michelle, this one is for you!

Ingredients: MPS Happy Birthday digi image; Markers - Bic; Floral Paper - Kaisercraft; Acetate Sheet - Kaszazz; Glaze Pens, Stardust Pens - Sakura; Latte Pearls - Kaisercraft;  Apricot Raindrop Roses - Sullivans; Gold Peel Offs - Upikit.

I played with the image to manipulate the sentiment into position as you see them here, so the only 'shape' is the cake itself.  I coloured the image with Bic markers, and the candles with stardust glitter pens.  I added a yellow glaze pen to the cake - one layer on the cake, two layers on the icing, and then added a layer of orange on the icing as well.  (The pic doesn't show, but the glaze pens add subtle dimension, and a glass glaze look, like wet frosting).

I created the 'card base' by folding an A5 piece of acetate - I trimmed the floral paper for the inside of the acetate card, added the gold flourish/vine peel offs, and fixed it inside the card, on the back side.  After adding the Raindrop Roses to the cake and fixing them in place, I added the  Latte pearls at the base of the cake, and the candles, and fixed the image to the front side of the acetate. The flames were cut and attached seperately.  As the acetate doesn't sit flat after being folded, the card is a great self stander.  It appears that the cake is floating above the flowers, and I love the shadow it casts on the paper (see the large pale blue flower)! I love working with acetate, and don't do it as much as I'd like to - I love the dimension and life it gives to creations.

Other than the image, there is no sentiment on the card - but you could pop a tag between the floral paper and the acetate back if needed.... which I've done in the past!  To photograph it, I popped a little tape midway on the right, which curves the card a little - it stands really well.  Thanks for peeping!

hugs and blessings,
Pauline

Stripes the Cat

Released into the wild from StretchNBubbles this month, is Stripes the Cat.  He is just too cute! Here's how I created with him!

Ingredients: Cardbase, Brads - Craft Affair; Papers - Cre8tiv; Markers - Bic; Stardust Pens - Sakura; Threads - Madeira, Latte Pearls, Rub On Sentiment - Kaisercraft.

I coloured the image with Bic markers, and then added yellow Stardust pen to is stripes, and Black Stardust to his nose and eyes.  I added Black/Silver embroidery thread to be his whiskers, stitching from the back, and leaving the ends free (although I added a sneaky stitch to hold each whisker as well). He sat aside while I worked on the background paper.

Following the dashed lines on the paper, I added a teal embroidery thread to add a little colour. I fixed the paper layers together with teal brads, then to the cardbase.   Stripes is fixed to the card flat at his feet and body, but with foam tap under his head to lift him with a shadow. I added a rub-on sentiment to finish. 

Stripes is waiting at the SNB Shop .... wouldn't you love to give him a home? Thanks for peeping!

hugs and blessings,
Pauline

Thursday, August 12, 2010

Sitting Bear

This is one of the cutest bears I've seen.  I love bears that sit.  Don't ask me why, I just do!  Thie image was provided for participants in the Designed 2 Delight Digital Stamps challenge this past week.  He reminds me so much of a bear I had when I was child! ANd he also looks like my brothers 'Mr Brown' too!

Ingredients used: Cardstock, Papers - Markers - Bic; Kaisercraft; Black Stardust Pen - Sakura; Chalks - Pebbles Inc; Paper Flowers - Green Tara; Mini Brads, Glazed Dot Button - Craft Affair; Burgundy Cord, Beads - unknown.

I coloured the image with markers, then added dark brown chalks when it was dry.  I also added Black Stardust (glitter pen) to his nose.  I created layers from a co-ordinating set, using some offcuts from another project to create the vertical ribbon strip.

To create the flower embellishment, I threaded cord through the glazed button, and added the beads, using simple knots to fix beads in place.  I fixed the button to the flower using foam tape pieces, allowing space for the cord, and set it aside.  After fixing the brads in place, I fixed the paper layer to the cardbase, then adhered the bear in place, flat, but used foam tape under his head.   The  flower embellishment was placed last, and ahered flat to the paper layer.

Thanks for peepin' ....

hugs and blessings,
Pauline

Wednesday, August 11, 2010

Flat out at For Fun!

The challenge this week at For Fun Challenges, was to create a card using an image from The Stamping Boutique - since they are sponsoring our challenge! For some reason I had stuck in my head that it shoulc be a 'flat' or 'lumpy-embellishment-free'  creation.  Anyhoo, as this is a sponsored challenge, the Design Team have used TSB digi images for their creations, and there will be a TSB prize for the randomly drawn winner!   Woohoo!  Here is my creation:

Ingredients: Cardstock - Basix, Kaisercraft, DCWV; Chalks - Pebbles Inc; Markers - Marvy Le Plume; Stardust Pens, Glaze Pens - Sakura; Pink Pearl - Kaisercraft.

I coloured the image with a variety of mediums - I used chalk mostly in the backround, and also for Princess' skin, and hair; I used stardust pens to glitz the Princess' clothes, and I used Glaze Pens for the flowering vines.  The shield used all three! The glittered feathers accenting the corners are cut from a scrap of DCWV paper from the  Sunset Beach stack (sorry, I don't know its' exact name!).

In keeping with the flat theme (or so I thought!) I've gone for a Clean and Simple Card.  I love embellishments, but it's nice and refreshing to do something clean and simple .... I find those layouts ver relaxing to look at!

Do pop in and join the For Fun Challenge this week.... remember, as it's a sponsored challenge, the random winner is in for a groovy prize!

hugs and blessings,
Pauline

Creative Chick Challenge

Here's my creation for the lastest SNB Creative Chick Challenge.... I didn't get the link to the challenge in time, so it isn't entered. I guess that leaves me with a free month!  Well, not really! 

This image is called Swirl It.  It reminds me of funky flowers, and also reminds me of omoeba and all those micro-biological beasties, of which I know little.  I don't really know what I was thinking when I was creating, so I'll just pretend I'm in an 'abstract art' phase!
Ingredients: textured cardstock - Craft Bits; Paper -Kaisercraft; Markers - Bic; Chocolate Pearls - Kaisercraft; Green Thread - Madeira, Brads - Craft Affair.

I coloured the image with markers, then followed the swirly lines to add stitches - I've stitched over the design's horizontal lines.  I added large and small brads in the 'flower' centres, and mounted the image on a distressed burgundy paper.  It is fixed directly to the cardbase.  I added another strip of burgundy, and a border strip from the same paper range, adding some chocolate pearls as an accent.  Thanks for peeping!

hugs and blessins,
Pauline

Saturday, August 7, 2010

Limited Runs Candy Images

Like to win some digis?  Nikki at Limited Runs has been busy creating more digi stamps.... she has just added around 20 to her collection, now totalling over 100! To celebrate, there is some blog candy happening - you can win 5 Digi's of your choosing... and for every 25  that join in, there will be a random draw! Go enter... and spread the word!   Oh yeah, you'll need to add Limited Runs blinkie to your blog, and answer a REALLY DIFFICULT question.... LOL .....

hugs and blessings....
Pauline

Thursday, August 5, 2010

Heartfelt Wishes from D2D

I think it's funny that we have so many Christmas images of wintery snow, snowmen etc .... since our Christmas is in the middle of our summer!  It was fun to play with a wintery snowman actually in WINTER!  The image used to participate in the Designed 2 Delight Digital Stamps challenge this week was a lovely snowman!

Ingredients used: Cardstock, Papers, Die Cut Border, Rhinestones - Kaisercraft; Glaze Pens, Stardust Glitter Pens - Sakura; Paper Flowers  - Green Tara, White Flocking.
I only coloured parts of this image - given that he's a snowman, he should be white!  I used a glaze pen on his carrot nose,, holly and leaves, and the heart he holds.  I used a Stardust pen on his scarf to litz it up a little.  I didn't trim off the snow base he stands on, rather I covered with with flocking, so it's lovely and fluffy, like snow.  I used die cut borders to create horizontal lines, and trimmed them with Ice Blue Rhinestones. I also usedthe rhinestones on snowman's buttons.  On the top border, I  added a couple of paper flowers, and a rhinestone centre.  I didn't use a sentiment, but I'm sure one could be added later if needed!
This week the image at the Designed 2 Delight challenge is a freebie, so it would be a good time to pop in and join the fun!   The new challenge is posted on Thursday night! Thanks for peepin' ....

hugs and blessings,
Pauline

Introducing ... Brileigh from SNB

I only got this image to play with yesterday .... I couldn't wait to play with it!  Actually, I've already coloured all my new release images for the month!  I just oculdn't help myself.  Here is a really sweet image, called Brileigh.  She is one of many new faces at StretchNBubbles.... they are all must-haves!

Ingredients: Cardstock - Craft Affair; Papers, Die Cut Border, Rhinestones - Kaisercraft; Scallop Border Punch - SU!; Brads - Craft Affair; Markers - Bic; Glaze and Stardust Pens - Sakura; Paper Flowers - Green Tara; Fabric Flowers, Stamens - unknown. 

I printed 3 images of Brileigh, and coloured with markers the various layers. I added stardust pens to accent the stripes on her dress, and her hair ties. When assembling the image, I used plain ol' DS tape - except for squares of foam tape underneath the sleeves to lift them.  I didn't adhere her hair, so there are two layers of it - you can't really see the dimension in this pic!). The dimension in the image is quite subtle, except for the sleeves.  I added pale blue glaze pen to three fabric blossoms, to give a little tone to match the papers.  I then threaded silk flower stamens through their centres, and fixed them through her hair like a garland. 

The paper layers of the card are simple mats, of a plain-ish colour, and an embossed leaf paper (I love that one!).  The scalloped layers are the same set of papers, punched with a scallop border, and layered.  The round 'border strip' is a die cut, again from the same co-ordinating set. Along the top border strip, I added some paper flowers and brads, and cut some tiny leaves from the pattern of some of the paper scraps. Finished off with some rhinestones in the corners....

Do pop in to the StretchNBubbles Shop to find this lovely image and many more, waiting to go home with you!  Thanks for peepin!

hugs and blessings,
Pauline

Wednesday, August 4, 2010

Water Water Everywhere!

You don't know how true that is.... after 10 years or more of drought, we are experiencing one of our harshest winters.... freezing cold, wet to boot, and seeming to never end. So in the true spirit of Water, our creative challenge this week for the For Fun Challenge was all about water!

Ingredients: Image - SU; Hammered White Cardbase; Green, Apricot Marble Cardstock; Black Dye Ink - SU!; Green Eyelets; Markers - SU!; Water pen; Gold Peel Off Sentiment.

I opted for a Clean & Simple design using one of my favourites from Stampin Up .... actually the whole set is! This is just so peaceful .... although I couldn't image dangling my toes in a lake at the moment.... Brrrr! I coloured the image with markers and a water pen. I use a palette to colour on the markers, and then use the water pen to pick up the colour and paint the image. The image is stamped onto a marble cardstock, giving it a very gentle backround. I simply attached the trimmed image to a green matt using eyelets, and affixed it to the cardbase. I added a sentiment at the bottom, and left if alone.... Clean and Simple!

I hope you'll join in the challenge at For Fun this week!
hugs and blessings,
Pauline

Sharing some Amazing Grace...

I just stumbled upon this little angel.... she is SEVEN YEARS OLD.  Her voice...brought me to tears. 


Rhema Marvanne - 'Amazing Grace' REVISED 6/11 from Black Olive Media.com on Vimeo.
Check out her story at her http://www.rhemamarvanne.com/ ...

hugs and blessings,
Pauline

Creative Chick Challenge

There's no place like home..... I thought that the image for this week's Creative Chick Challenge would make a fab card for someone moving into a new home!

Ingredients: House image - SNB; Cardstock, Die Cut - Kaisercraft; Paper - K & Co; Markers - Bic; Glaze and Stardust Pens - Sakura; Brads - Craft Affair.

I printed two images, and coloured using markers - in the background image only the sky and clouds, in the foreground the house, tree etc. I then added glaze pens to the clouds, and to accent the house and tree.  The path is over coloured with stardust pens.  I fixed simple layers with brads and mounted it to the cardbase.  I cut strips of the DS paper to create a ribbon-like strip, and attached a die cut with brads.  I hand scribbled a sentiment (and I can see my bad penmanship... I must practice!)

Come join in the Creative Chick Challenge! Our very next challenge, popping up later today, will see you receive the image free... (just follow the link above, and click on the creative chick logo).  Submit on time to get the next free image via email... it's a great progressive challenge, and you can get a freebie each week! If you miss the start of the month freebie, you can join in by nabbing your missed images from the SNB Shop. Thanks for peeping!

hugs and blessings,
Pauline

Sunday, August 1, 2010

Aloha Blog Hop!

 The Michelle Perkett Studio is having an ALOHA DT BLOG HOP ...in thanks and celebration of the gals that served as Michelle's first Design Team.  We are saying ALOHA to those lovely ladies for their amazing inspiration. For the Blog Hop, we created using Michelle's Leilani image, and the word "Aloha" which means hello, goodbye and thank you!!  So here is my 'aloha' to the outgoing DT ladies!

Ingredients: Textured Olive Gold Cardbase; Glitter CS - DCWV; Markers - Bic; Glaze Pens - Sakura; Chalks - Pebbles Inc; Flower Brad - Craft Affair; Champagne Rhinestones, Pearls - Kaisercraft; Adhesive Textured Ribbon.

Here's some fun... a link to a Hawaiian name translator! I  had to use my maiden family name, not my married on, so mine is Paulina Linaka Pilipeke... I love listening to Polynesian languages....spoken or in song.... just beautiful.  Hubby and I honeymooned in Western Samoa ... wonderful!!!  Funny thing too.... whenever I'm in a really happy mood, i find myself singing "Mele Kalikimaka" .... a Hawai'ian Christmas greeting!  Great song too...

Did you arive here from Lee's Blog?  Oh good.  Just in case you missed the start of the Blog Hop, you can return to Michelle's Blog and begin your journey.   

Your next port of call is at  Jan's Blog..... remember to leave a comment at each blog stop along the way to be in the running to win one of Michelle's new digi stamps!

hugs and blessings and ALOHA!
Pauline (Paulina Linaka Pilipeke)